

Well, I've wrapped up all of the tournaments I can play in for 2009 for Lord of the Rings, now it is time to consider 2010. I've definitely decided to go with Mordor - I've got an absolutely huge stash of Mordor models, so I am hoping to create a "buffet" of options I can pick and choose from and use different forces for each tournament. Some of the models I really want to use:
- The Witch King
- Orc Drummer
- Orc Shaman
- Mordor War Catapult with Troll Loader
I've put together my first list, which I may use for the Gathering, depending upon how it play tests.
Nazgul
The Witch King of Angmar (2/10/0)
Cirith Ungol
Gorbag with shield
Orc Drummer
20 Orcs with shields
8 Orcs with two handed weapons
11 Orcs with bows and spears
Mordor War Catapult with Troll Loader and extra crewman
Points: 600
Models: 47
Might: 5
Bows: 11/44
I'm thinking of this force partly because of the experience at the Gathering last year. There were a lot of horde forces, particularly with high defense. Anthony's Uruks (which have appeared two years in a row, so I think I can count on them being there again) and Sean's Minas Morgul are examples of this. While I can try to go horde as well, I really like playing with models that people don't normally see in tournaments. Yeah, the drummer is becoming de rigour these days, but when was the last time you saw Gorbag, the Witch King, or a Catapult? These guys can definitely be used well, and I can see very bad things being done with all of them.
One other thing that I'm doing is modifying all of my plastic archers. I want to be able to use them as both trackers and spear carrying orcs, so I'm adding small magnets to their quivers, which I'll then use to hold paper clip spears. I've only got about 30 orc archers together, so now I can do both without having to buy any more models, and still be able to field a horde of trackers or spear/archers if I want!
Showing posts with label Gathering in the Desert. Show all posts
Showing posts with label Gathering in the Desert. Show all posts
Saturday, August 1, 2009
Thursday, July 2, 2009
Updating the Errand
I recently got a new digital camera (primarily to take pictures of the baby with!), but I decided to see how it works for photographing minis. Not bad, but I do kind of miss the manual settings I could use on my old one. Of course, I don't miss the old camera's far left hand tripod hole (ALWAYS drooping on the tripod!), and I really like the macro settings on the new one - The pics of Gandalf and Ecthelion were taken from a couple inches away, something I couldn't do with the old camera.
Without the manual shutter settings, it does mean it's harder to make out contrasts and the like. However, I am also noticing that the pics look more like the models do in real life and on the table, where my earlier pics were so bright and clear that they sometimes looked better painted than they really were. So for my purposes today, the new camera works better. Also remember that each picture can be clicked on for a larger view.
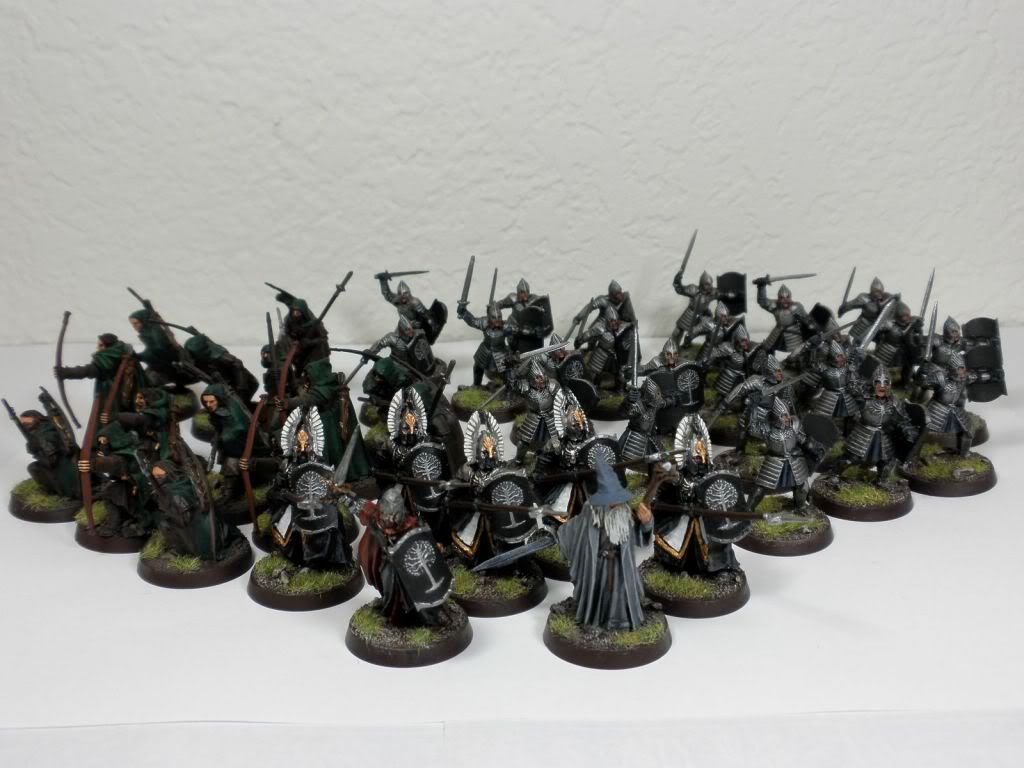 So this is the overall army. My general painting style tends to be subtle, and on the whole I think this looks pretty good on the table. The earthier tones holds it all together, and there is a lot of black and brown. The individual groups definitely tie together - green for the rangers, a blue/grey for the warriors, white for the Guards, and red for Ecthelion.
 Where this starts to fall apart is in the details. OK, that and I didn't put enough time into painting last time. I'm afraid I'm going to need to step the highlighting up - believe it or not that is three layers and a wash on the cloth, but the low steps in color make it all wash together, resulting in a less highlighted effect. I also need to highlight the details like the belts, hair, and possibly even the armor and hair. Some blacklining of details wouldn't be a bad idea, either.
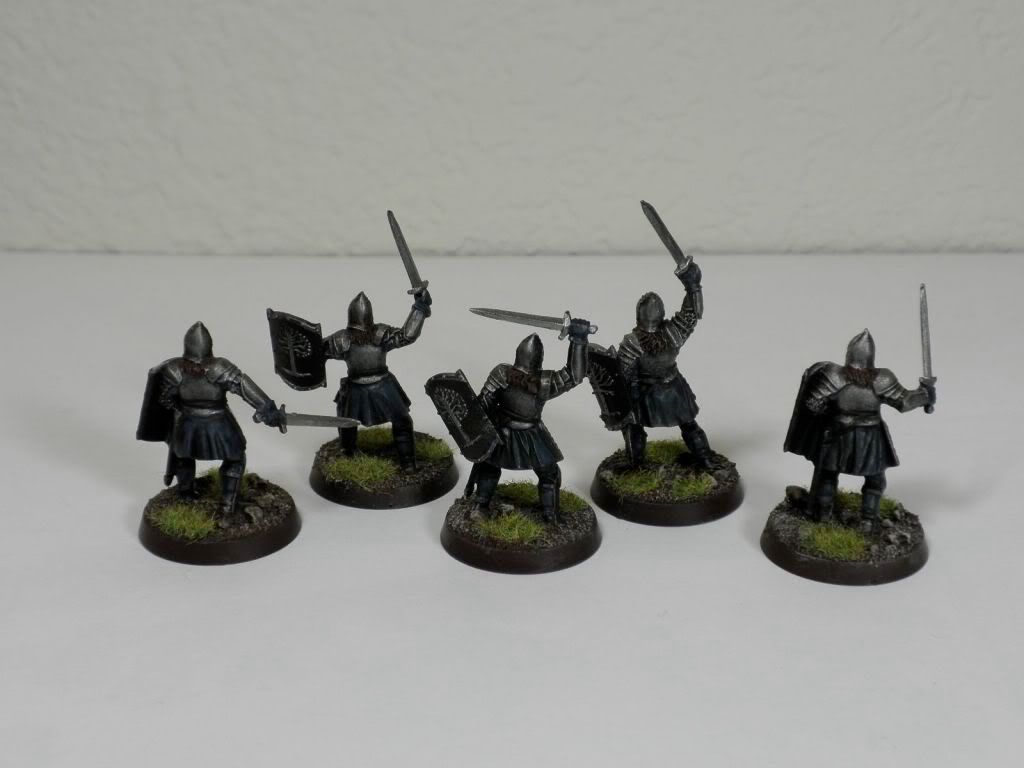 Back shot of the warriors - the cloth is a little clearer, but you can see the unhighlighted belts and hair.
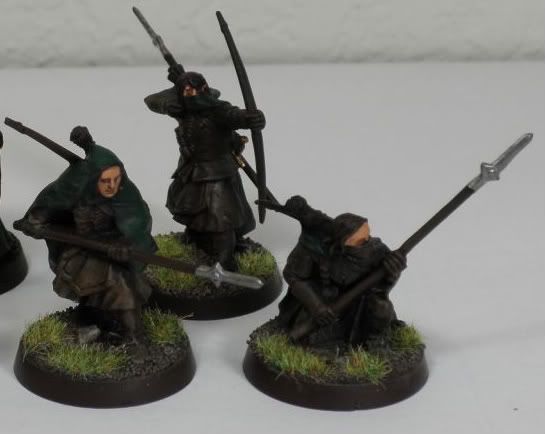 Here are the rangers. There's a little inconsistency here - I painted the metal rangers on the left some four years ago while working for GW. I don't remember the exact colors, and the foundations weren't available yet. But you can see there is better highlighting, the skin is better, and there is a broader range of colors within the palette. The browns all wash together on the newer models instead of having a more noticable line. I was really, really rushed on these guys.
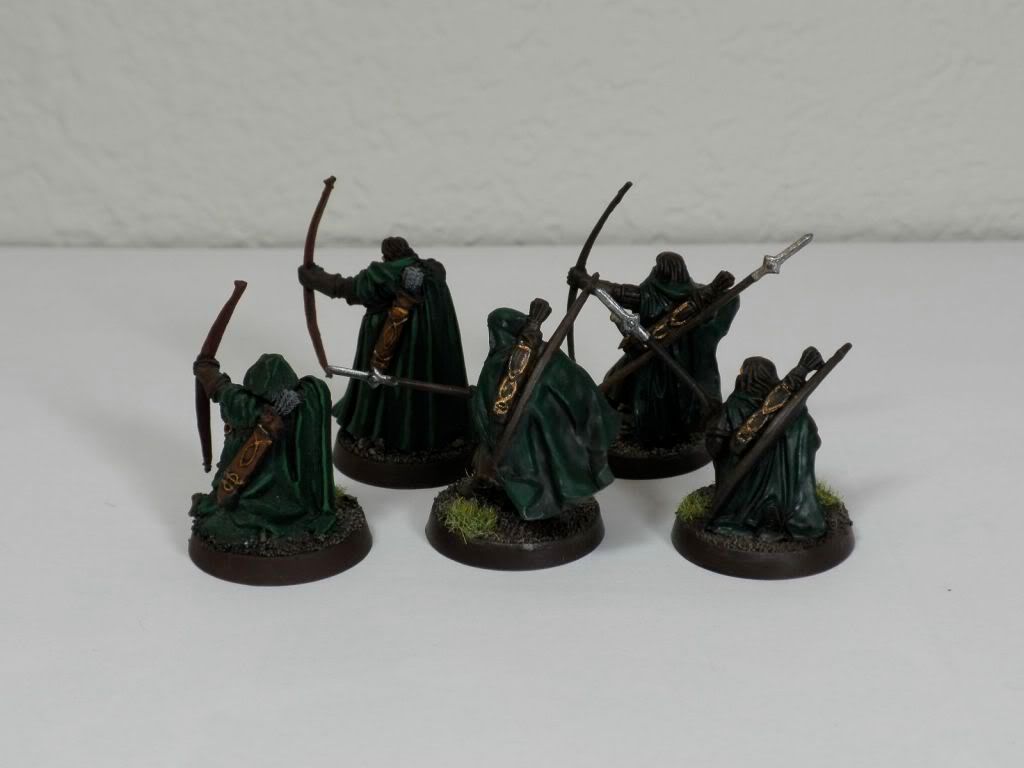 It's a little more obvious how rushed I was on the back. The old models have nice highlighting on the cloaks, while the new ones were just block painted and washed. I also didn't use any highlights on the quivers.
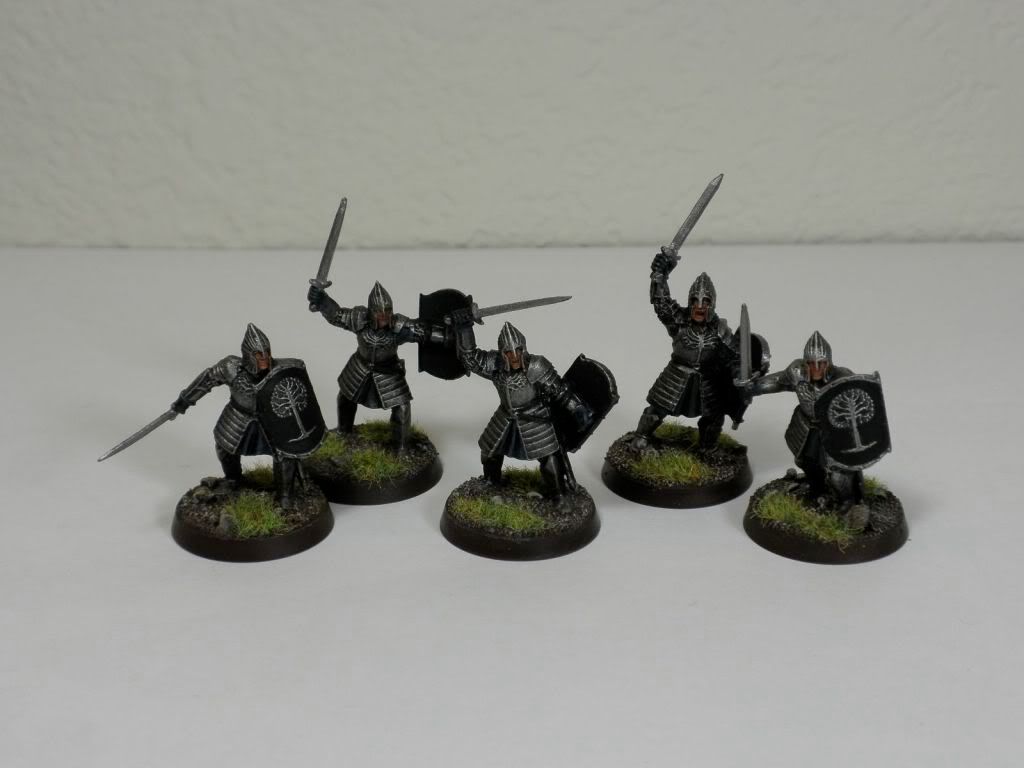
 These guys look pretty sharp from the front. That white was a pain, but the blacklining works nicely. I think I'm going to use a Micron pen to add a design on the tabard edge, and possibly put a decorative yellow and black edge on the cloak as well. Some gold details on the helmets might also work nicely.
 The cloaks are another story. Single grey highlights that look slapped on. I'm not sure if I should go down from these highlights, adding a midpoint between them and the shadows, or go even higher.
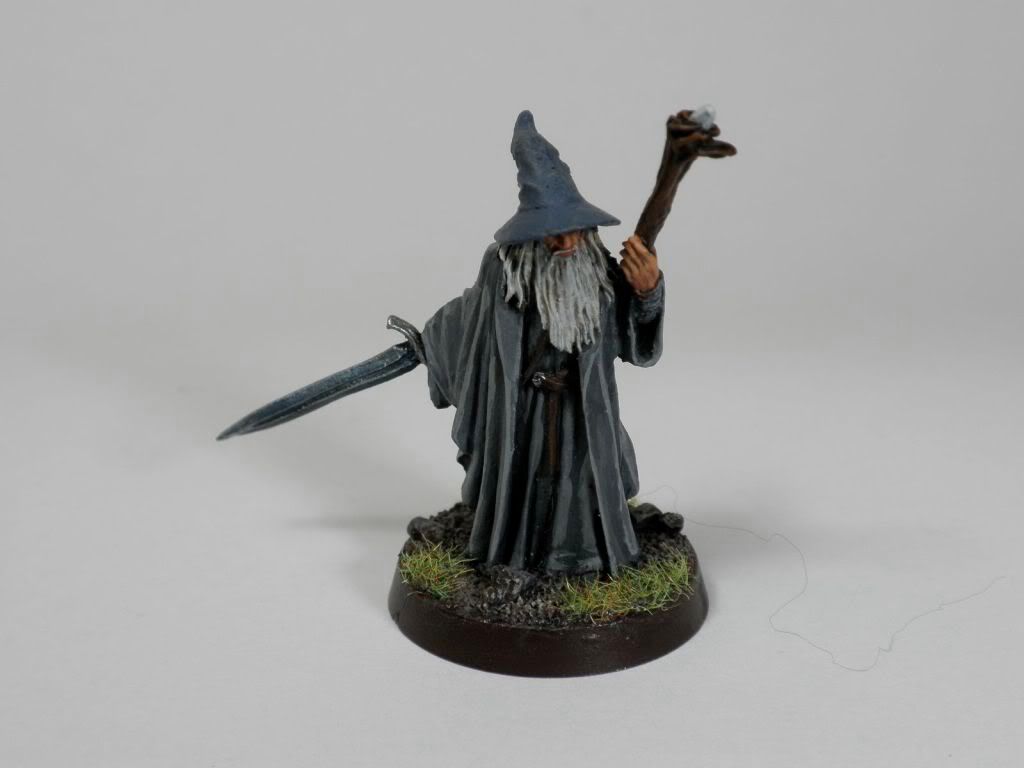 Without question, Gandalf is the best model in the army. I put a lot of time and care into painting him, particularly his hands and folds of the robe. I even highlighted the belt and swordblade.
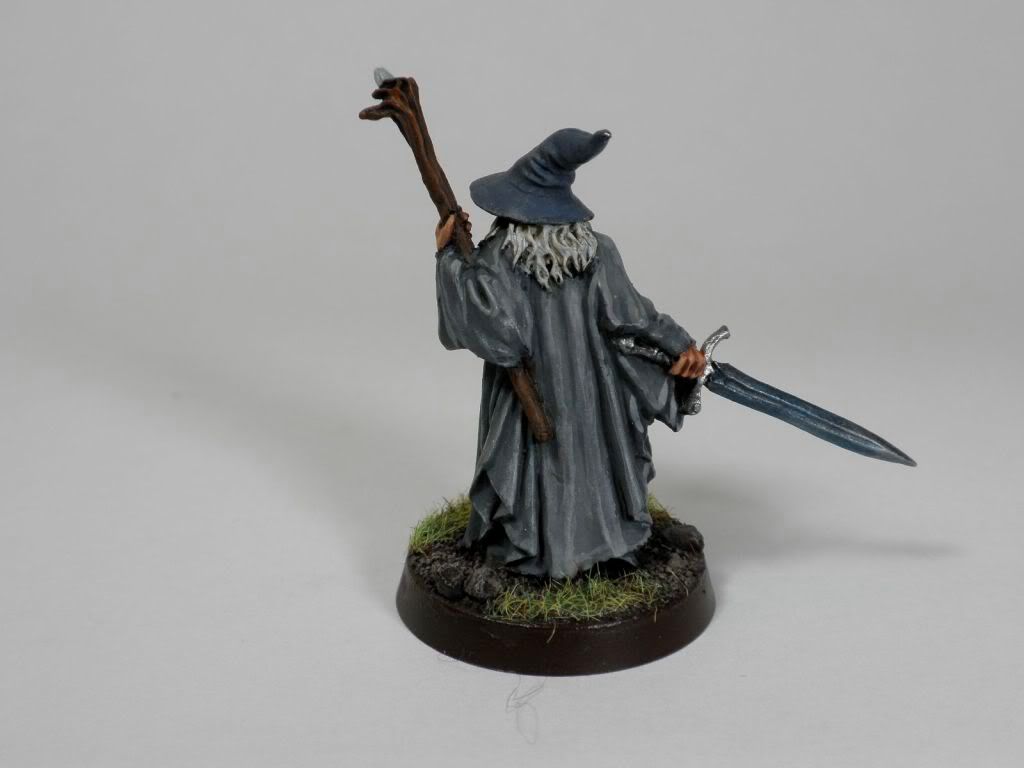 I do have a little chip on the end of the hat, but I'm a bit afraid of fixing it and causing more damage by not getting the same effect as before.
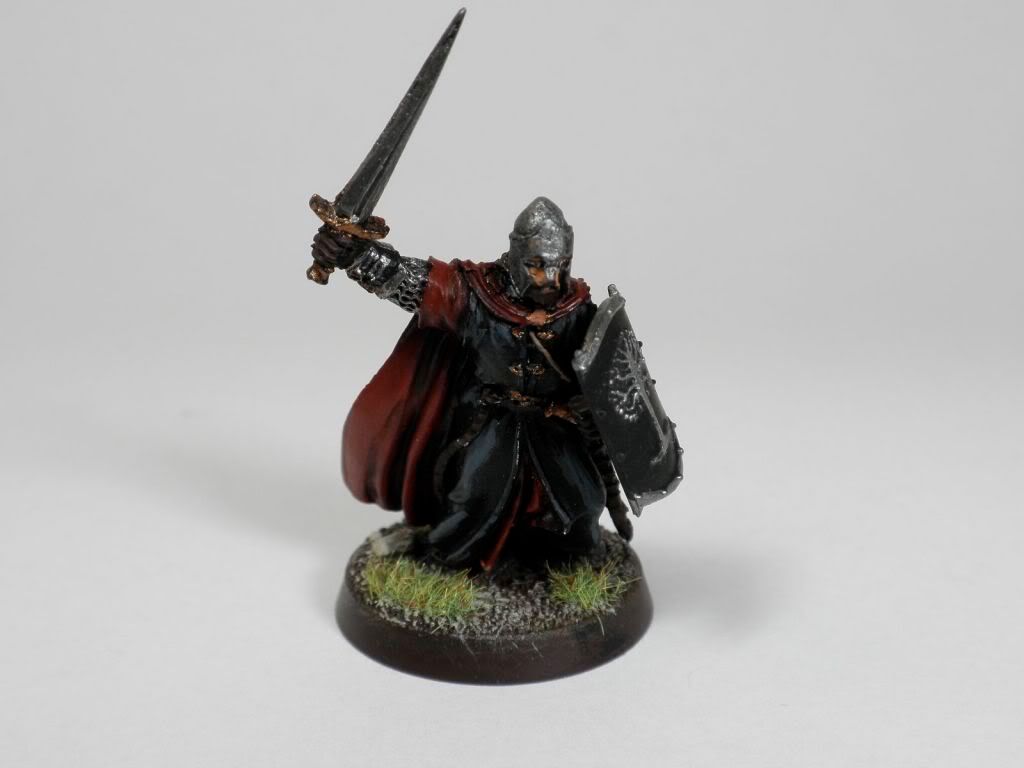 In contrast to Gandalf, Ecthelion screams "rush job". While I put some time into the cloak, it still comes off too subtle and dark. The rest of him is single, sloppy highlights, drybrushing, unpainted details, and general blah. I've got a lot of work to do here.
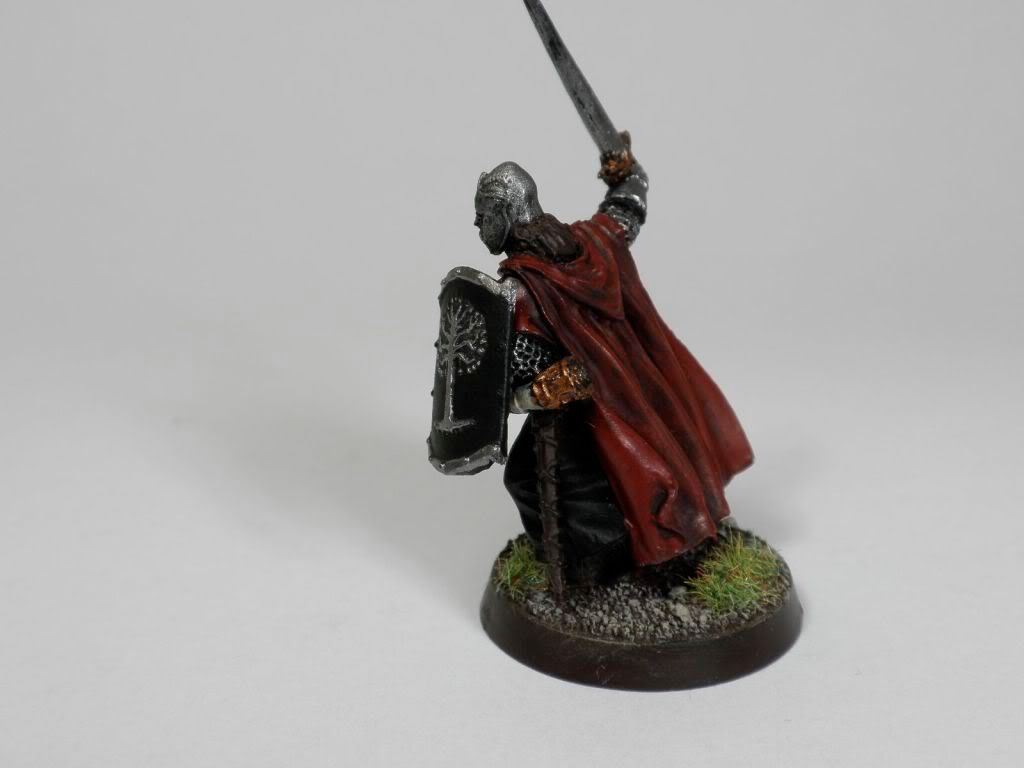
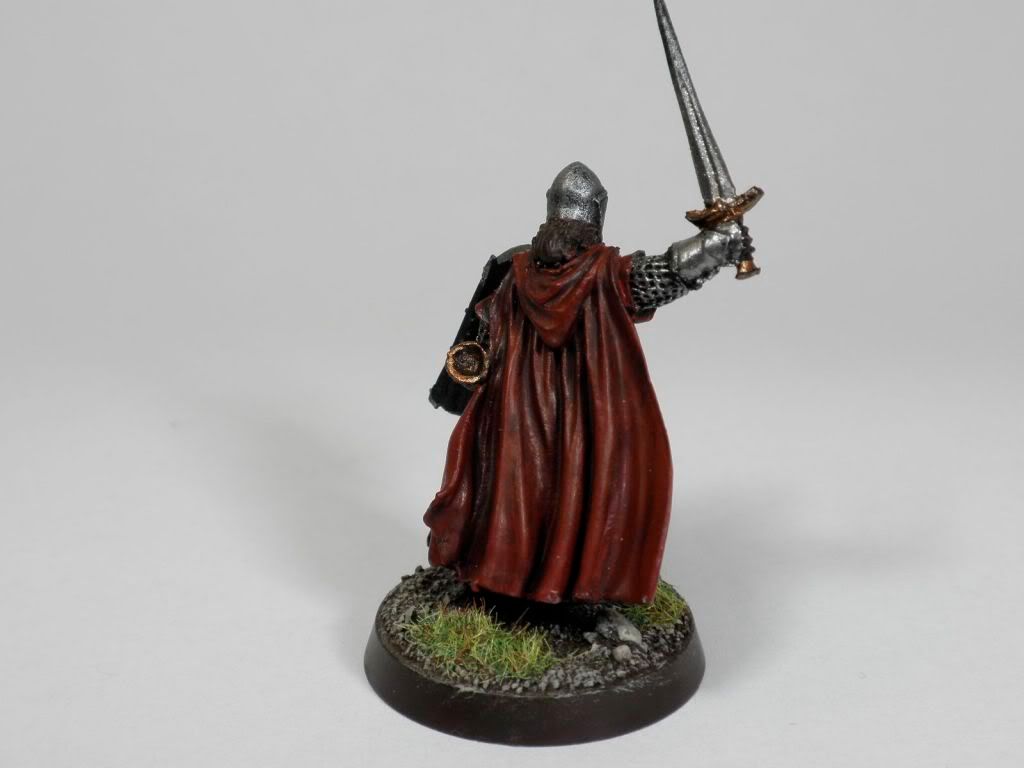
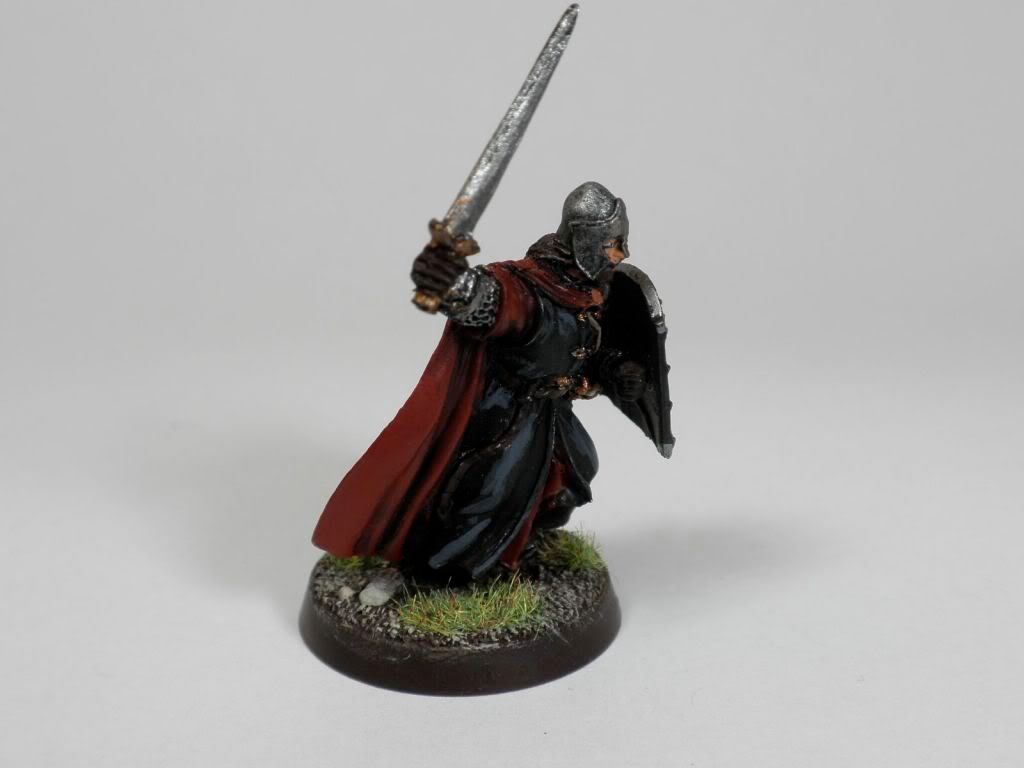
So I'm mostly wondering how much I should play up the highlights - I've always gone more subtle with my LOTR models, but I am starting to think I need to really spice it up with brighter highlights. Any thoughts? Tim K, I'd particularly appreciate your insights on this, since you scored this army at the Gathering.
Thanks a ton to everyone who has bothered to read this!
Without the manual shutter settings, it does mean it's harder to make out contrasts and the like. However, I am also noticing that the pics look more like the models do in real life and on the table, where my earlier pics were so bright and clear that they sometimes looked better painted than they really were. So for my purposes today, the new camera works better. Also remember that each picture can be clicked on for a larger view.
So this is the overall army. My general painting style tends to be subtle, and on the whole I think this looks pretty good on the table. The earthier tones holds it all together, and there is a lot of black and brown. The individual groups definitely tie together - green for the rangers, a blue/grey for the warriors, white for the Guards, and red for Ecthelion.Where this starts to fall apart is in the details. OK, that and I didn't put enough time into painting last time. I'm afraid I'm going to need to step the highlighting up - believe it or not that is three layers and a wash on the cloth, but the low steps in color make it all wash together, resulting in a less highlighted effect. I also need to highlight the details like the belts, hair, and possibly even the armor and hair. Some blacklining of details wouldn't be a bad idea, either.Back shot of the warriors - the cloth is a little clearer, but you can see the unhighlighted belts and hair.Here are the rangers. There's a little inconsistency here - I painted the metal rangers on the left some four years ago while working for GW. I don't remember the exact colors, and the foundations weren't available yet. But you can see there is better highlighting, the skin is better, and there is a broader range of colors within the palette. The browns all wash together on the newer models instead of having a more noticable line. I was really, really rushed on these guys.It's a little more obvious how rushed I was on the back. The old models have nice highlighting on the cloaks, while the new ones were just block painted and washed. I also didn't use any highlights on the quivers.These guys look pretty sharp from the front. That white was a pain, but the blacklining works nicely. I think I'm going to use a Micron pen to add a design on the tabard edge, and possibly put a decorative yellow and black edge on the cloak as well. Some gold details on the helmets might also work nicely.The cloaks are another story. Single grey highlights that look slapped on. I'm not sure if I should go down from these highlights, adding a midpoint between them and the shadows, or go even higher.Without question, Gandalf is the best model in the army. I put a lot of time and care into painting him, particularly his hands and folds of the robe. I even highlighted the belt and swordblade.I do have a little chip on the end of the hat, but I'm a bit afraid of fixing it and causing more damage by not getting the same effect as before.In contrast to Gandalf, Ecthelion screams "rush job". While I put some time into the cloak, it still comes off too subtle and dark. The rest of him is single, sloppy highlights, drybrushing, unpainted details, and general blah. I've got a lot of work to do here.So I'm mostly wondering how much I should play up the highlights - I've always gone more subtle with my LOTR models, but I am starting to think I need to really spice it up with brighter highlights. Any thoughts? Tim K, I'd particularly appreciate your insights on this, since you scored this army at the Gathering.
Thanks a ton to everyone who has bothered to read this!
Wednesday, February 25, 2009
AAR of Gathering in the Desert 2009
The blood has cooled, the paints are put away, and the results are posted - it's time to reflect on the Gathering that is past. Well, my part in it, anyway.
First off, I can definitely call the tournament a success. Having gotten 4th Overall and 2nd General were both achievements I can be proud of in that field. I understand how the army works pretty well and it showed in my battles. I had a great time playing and did my best to make sure my opponent had a good time as well. I did pretty well in Sportsmanship - if Brent gave me #1 on his opponent ranking (which I think he did) then I earned the equivalent of one #2 and three #3 rankings. My downfall (if you can call it that) was my rushed painting. I only had a higher score than 4 other players, and was well behind 2nd and 3rd Overall. If I got the score I'd earned in Vegas I'd have gotten 3rd Overall and nearly taken Best Overall (since #1 didn't paint his own army).
I had about as good an army design as you can get with a big burly character in the lead. I was light on numbers but still had the survivability to avoid being laid to waste. The Guards of the Fountain Court, as suggested by Brent (I think), were a fantastic addition to the list. Ecthelion, using the King of Men stat line, was a great combat hero, overtaking most opposition with his F5 and two attacks plus spear support. The rangers also earned their place, softening up the opposition before rushing into help out via trapping and spear support. Gandalf definitely made the list what it was, though - all the tricksy stuff I could pull with him was awesome. I really enjoy playing with magical powers, partly because so few people actually have encountered them it leaves a significant imprint on them. I'm not sure how the army would have performed on objective holding missions or mobility missions (like Reconnoiter), but the missions given suited the army well, except for those darn Uruks.
Sportsmanship scores are always something of a quandary for me - I can't deny that I play to win and that I understand the rules very well and will let my opponent know when they are doing something wrong. However, I try to be nice about it and will readily point out when they could do something advantageous or bad to me as a result of a rule they don't understand. The biggest problems come when I encounter someone who thinks they know the rules but really don't, or someone who conveniently forgets rules when it doesn't suit them.
One brief point of conflict in my last game that troubled me was when I trapped a Morgul Stalker between the edge of the long hill we were on and a combat. It was on the Angmar table, and the hill had started against the edge of the table (it was flat along one side, clearly designed to sit along the edge). However, when this combat happened it had gotten bumped, so there was about a 1/2-3/4 inch gap between the actual table edge and the edge of the hill. My opponent brought up that he could retreat down the hill, and I pointed out that it had started against the table. He had been leaning over this hill to move his models in the center, and I'm thinking that was when it got bumped. He gave me this snort, and when I asked if it was a problem, he replied, "Oh, no, it's just one model", with a subtext (to my mind) of "You're an ass for pushing this point, but I'm going to let you have it to keep my sportsmanship score up". He wasn't obnoxious or anything, but I'm pretty sure that because I didn't back down there I got a lower ranking on the final sportsmanship sort. I'm just not sure how to deal with this, as I don't want to be walked all over, but I also don't want to lose a potential advantage that the rules say I have.
Ah, my painting. I knew it wasn't up to snuff, but the full impact of the rating did make me sad. I completely deserved it, though. I was painting on the plane, had minimal highlights on most of my models, and used a lot of quick and dirty methods. I need to significantly step up the detail painting and do another layer or two of highlights all over the models. That could earn me 6 more points on painting without a huge expenditure of effort, and possibly even 8 if I really impress the judges. 6 would have put me less than a point behind Brent and Best Overall, 8 would have given me the tournament. I can see adding some detailing to the cloaks and trim of the Fountain Court, plus maybe some battle damage on the warriors shields to get that Hand Painted Details level.
So I'll definitely put some more time into painting. I'm going to have to skip Adepticon - some day I will definitely have to go there, though. However, I can see doing the Necronomicon and GT Vegas, and might even be able to squeeze in a Games Day or something. Of course, I'm going to have to be very, VERY nice to my wife, and hope our child doesn't decide to be born while I'm playing with toy soldiers...
Monday, February 23, 2009
Last battle report for Gathering
Round 5
Opponent: Sean Ramirez
Table: Angmar
Scenario: The Last Alliance
This scenario was a straight-up kill ‘em scenario with the emphasis on killing valuable people – it was based upon victory points, which is the points value of the stuff you kill. This is, in my opinion, not a very good mechanic for LOTR. The game is specifically designed to be based upon numbers, and while individual models can be very expensive, the most expensive are the ones that affect other models and help their fellow models. Heroes are good on their own, but their real value is in holding other models on the table via Stand Fast and doing Heroic Actions. Some heroes just aren’t that hard to kill (Gandalf not being among them, apparently), but can be very valuable – Gildor Inglorian being perhaps the best example of this. After all, a Half-Troll is way more effective in combat than a Captain of Minas Tirith, but the Captain costs more than twice as much. So I didn’t like that aspect of the scenario. Another fun aspect of the scenario was that it was 12” deployment zones, and if you had any of your own models in your deployment zone at the end of the game the best you could get was a draw.
Sean had the army that I least wanted to play in the tournament. He was running 30 Black Numenoreans backed up with spear supporting orcs, some trackers, and three Morgul Stalkers thrown in for fun. This crew was led by The Dark Marshal and a Black Numenorean Marshal, which meant that all of those terror checks I’d be taking would be at -1 Courage. The Nazgul could also effectively neuter Gandalf, which really irritated me. On top of this, I was outnumbered by 10 models. I knew this would be a rough game.
I lined up in my left corner, hoping to give the rangers a clear bunch of shots as the enemy closed while creating a bottleneck in the center. I hoped I could hold off any support coming from the sides while I demolished anything that came down the middle of the table. Sean’s deployment seemed to support this, with significant contingents taking his flanks and a big group around the heroes in the center.
The first round of shooting was awesome – I killed three orcs, two Numenoreans, and a Morgul Stalker. Sadly, that was the most my shooting did for the rest of the game. I think I got a couple of small kills, but between the short distance between armies and getting stuck into combat, I didn’t have a chance to shoot much more.
The bad things started happening with Gandalf right off the bat. After getting up Terrifying Aura and Blinding Light, the Dark Marshal closed to within range of a Sap Will. The next couple of turns was me trying desperately not to lose any more will, with one big Sorcerous Blast thrown at the Marshal in a high stakes gamble to kill him – I even blew all of my remaining Might to score a wound, but Sean easily made his Fate roll. Finally there wasn’t anything left, and I was limited to Gandalf’s one free Will per turn and the Blinding Terrifying Aura of Light went out.
We got stuck into combat and I started learning just how incredibly annoying Numenoreans were. I was failing a bunch of my Courage tests, so I started moving pieces that could block routes to an inch away from enemy models to channel them or provoke a charge (and I didn’t have to take a Terror test). I also had small blocking contingents holding off a chunk of his army that was trying to turn my flanks. The Fountain Court Guards were a HUGE help here, since they could charge without testing their Courage and could take abuse from S4 hits. I started to whittle down his force, but I’m losing people as well. Ecthelion in particular is doing a great job of killing Numenoreans.
There isn’t a lot to tell after that – we just ground away, though Sean kept using the Nazgul to try to do bad things with spells, usually not succeeding. I did manage to punch a hole in the Numenorean line and run a Fountain Court Guard into the Dark Marshal, getting rid of a point of Will. Finally the turns are drawing close to an end, and it’s obvious we’re tied. My Fountain Court behind his lines is occupied, but I pull one last trick out of Gandalf’s sleeve – I cast Command on the Marshal, who at this point has only one point of Will remaining. This allows me to move him into combat with my Fountain Court Guard. This is awesome! As long as I get to fight, the Nazgul will go pop at the end of the turn.
Sean shoots into combat with all of his trackers, and manages to kill my Guard on the second shot!?! DAMN IT!!! He then proceeds to mow down another 40 points of troops that the trackers also hit. OK, so the first round of archery went to me, the last roud to Sean. We ended up drawing, with Sean ahead by about 50 points, but needing 60 for the win. Interesting thing about the game – I won each and every priority roll. Sean did not have priority the entire time.
I can see now that the way to win this fight would have been to punch a hole in the line of Numenoreans and rush through with my Guards to engage the Nazgul directly. That is what I should have done with my Sorcerous Blasts, not trying to wound the Nazgul. That would also have saved my Might for Heroic Combats and anything else that would have helped clear a path through the Numenoreans. On Sean’s side, I would have put my Black Numenorean Marshal on one of the flanks to assist in crushing opposition there and get into my rear area faster. Other than that, I can’t see any major mistakes beyond forgetting to move Gandalf after several of his casts.
Result: Draw (10 points)
My overall result was a little confusing – if you include the painting points from the guy who didn’t paint his own model, then I was 4th Overall and 2nd Place General. Our tie combined with a victory on Brent’s part gave him Best Overall, and Anthony, who played and beat some of the best players in the country minus Tim Hixon, clearly got Best General. He would have gotten Best Overall if he’d just PAINTED HIS OWN DAMN ARMY! Ah-hem.
Anyway, I’ll do a review of the tournament itself and my own lessons learned tomorrow night.
What a great event - Gathering in the Desert 2009
I’m on my way back home after a fantastic tournament. The Gathering in the Desert 2009 was perhaps the single most enjoyable gaming experience I think I’ve ever had. It was in large part due to the incredible hospitality of Tim Kulinski as well as the great community of players who came together for this event, both local Phoenix area players as well as us “out-of-towners” who came to participate in the first LOTR event of the 2009 Tournament Circuit.
So first off, I really could have been better prepared for this event. I wasted a lot of time that could have been better spent painting my models to a higher standard. I was highlighting Fountain Court Guards on the flight to PHX, painting until midnight the night before the event with Tim, and then even more painting the morning of. I even squeezed in painting the belts of my warriors black after the first round while waiting for lunch to arrive… I really want to get some more layers of highlights onto all of the models, detail out the Fountain Court, and give Ecthelion a serious paint job. Alas, it will be a while before I am able to make that happen, since I have GOT to catch up on my grading – I won’t paint anything until I’ve cleared my backlog of tests.
I was happy to recognize a few of the folks there – Tim Hixon was the only other California resident there, and I recognized Brent Sinclair from the Las Vegas GT. The store where the event was held was co-owned by Kyle Kinghorn, a great hobbyist and manager who I knew from when he managed the LA Battle Bunker for GW. It was great to see him again, and he did play – we also got a chance to catch up on gossip about GW and what he’s been doing with his store, Empire Games. I want to throw this in about Kyle’s operation: Empire Games is probably the best hobby game store I’ve ever been in. The environment is clean and orderly, there is tons of great looking gaming terrain, and it is well stocked. Kyle ran a great store in the LA bunker, and I think he’s outdone even that with his own store. Now if only some of the tables were lower…
Anyway, on to the games.
Round 1
Opponent: Robert Brightwell – Angmar
Table: Emon Euil
Scenario: Bilbo’s Treasure
This was a neat game where you could earn three extra battle points by searching for Bilbo’s treasure but was otherwise a “wipe ‘em out” game where you wanted to reduce the enemy to a quarter of their starting models. There were six markers spread across the table, under each of which was a number. We rolled to determine which number marker it was (turned out to be #6. I deployed my rangers in the middle of my deployment zone with a clear view across the table, then split my warriors on either side of them. I put Ecthelion on my left and Gandalf with the rangers. There was an objective in the crater in front of me, and another one up on a large rock pile in front of Ecthelion’s force.
Robert put his wargs on his right led by the Warg Chieftan, and after some consideration put Burduhr in the middle with a clear path down the center of the table. He spread the rest of his force out across the table with his Shade behind Buhduhr.
I rushed my models forward, getting Blinding Light going with Gandalf and approaching the two rockpiles to my front. I did move half with the rangers, since I figured I’d be able to range Robert’s wargs. Sure enough, the wargs had a couple in range of my archery and I managed to down one of them. I started climbing the rocks in front of me on either side, on to check the objective and the other to provide a defensible position. Robert was sending his wargs to check on one of the objectives to my left, but I saw the main engagement was going to be in the center. Most of Robert’s army was pounding down the table straight at me behind Burduhr. My rangers decided to do something about that. One round of shooting saw Burduhr lose a wound, and a second round saw him dead. The rangers continued to pick off orcs after that.
We had collectively turned over three counters when I managed to find the treasure, which oddly enough was on top of the rock pile on my left. I pulled the chest back and formed up Ecthelion’s crew to go after the wargs and protect the treasure. As the chieftain hit my troops, I brought out Gandalf (who had gotten a Sorcerous Blast off to some effect, but nothing major) to Immobilize the Warg Chieftain, then dogpiled him with Ecthelion and a bunch of other troops. The warg fell under a hail of sword blows.
The fight on the left ended pretty quickly with the wargs being slaughtered, but the center was proving a little harder. The reason? That damn Shade. I hate Shades. I have no idea how to really deal with them other than just take the -1 to all my die rolls. I tried to blast him and move him with Gandalf, but the blasts didn’t work and the Command ended up moving him so he was only 5 inches away from all of the fights instead of 2 inches. Suck.
One redeeming feature for me was that with all of his archers in the backfield, I was outnumbering the orcs, and despite the damn Shade, I was taking them down. After a few turns, I had managed to get the treasure off of my own side, then broke Robert’s force. That was effectively the end of the game, as his troops evaporated. I was pretty stupid, though - I cast Command on the Shade to get him out of the way of the combats, but that left him on the table! I should have just let him fail his Courage 1 test and run away.
This was an enjoyable game, but Robert did play into my hands by charging the center. I expected the wargs to split off to the left, and Ecthelion handled them masterfully. By running into the teeth of my archery, Robert lost the game. With Burduhr down and his numbers thinned by archery and hanging his own archers back I was able to corral him into the center, turn his flanks, and devour him. I would have kept most of the troops to the flanks, particularly Burduhr, who could have gotten around a lot of the rock piles without any problem. This would have reduced the impact of my archery, and possibly allowed him to hit one of my own flanks, reducing my number advantage. But Robert was very easy to get along with and does have a good grasp of the game, so I enjoyed the experience.
Result: Major Victory plus bonus (23 points)
Round 2
Opponent: Anthony Pigati – Legion of the White Hand
Table: Amon Hen
Scenario: Light the Beacons!
This was another kill ‘em scenario which had bonus point for lighting the beacons in a diagonal line down the middle of the table. The catch – if you get a 1-2 while trying to light a beacon, you light yourself on fire!
Anthony was playing a very rough Uruk-Hai list - two captains, five berzerkers, twelve crossbowmen, and the rest in swordmen and pikemen. He outnumbered me by two. I knew in order to get him, I’d have to isolate part of his force and destroy it to even the odds.
I tried to do just that by starting off rushing towards the beacons. Anthony followed my lead by splitting his crossbowmen to go for the corners and sending his mass into the center. He won priority the second turn and did the same. However, now I sent everything I had towards my left. He ended up splitting his force again to send some troops around the Seeing Seat, and I pounced. I put Ecthelion and a few more troops on my right to delay reinforcements and then tried the ole’ “Come hither” with Gandalf – I throw a 2 die Command on the Uruk Captain on Anthony’s right, and get a 6. Oh, he is so dead… What do you mean he rolled a 6 with his one point of Will?!? Crap. I shoot at him, and manage to get a little bit, but nothing that will turn the tide.
The second turn I commit. Gandalf is still failing me, getting only 1” off of a Sorcerous Blast that should have knocked over some 5 models, and then I commit. My troops pour into him, lining up to get 4-on-2s and trapping. I’m turning his flanks – this will only be a matter of time. I kill on berzerker off with a lucky roll against a lone ranger, and then the Uruks go on a killing spree, taking something like a quarter of my force off the table. It’s a devastating blow, and the next round isn’t much better. Now I’m really in touble, and for all of my efforts, I just can’t get anything to happen. I finally manage to isolate the Uruk captain on my left, but with only Gandalf and three other models against him, I’m not able to finish him off – I just don’t have enough models. A few turns after the butchery, I fall below a quarter and the game is over.
This one was really frustrating. I did everything right, Anthony screwed up big time, I capitalized on it, and a tear of 6s not only saved his bacon but turned the tide in his favor. Anthony admitted that he was sweating bullets when he saw what I’d done, and that his dice alone saved him.
Result: Major Loss plus bonus (6.5 points)
Round 3
Opponent: David Bishop – The Serpent Horde
Table: Spring Thaw
Scenario: Look to the East
This was a straightforward kill ‘em scenario with a catch – half of your army starts on the board, and the rest comes on in a random turn from the “east”, your right hand table edge. David’s Harad was a good horde list – a cavalry contingent of raiders and Serpent Guard led by Suladan, several archers with another captain, and some 30 regular warriors with spears. He outnumbered me by almost 50%.
I put Gandalf and all of my rangers on first with a few warriors to back them up, setting them up towards my right behind a hill. The rest of the warriors and Ecthelion are put into reserve. David puts his archers and a chieftain on his left, while putting his cavalry with Suladan near the center behind a hill. His spearmen are all in reserve.
David starts off by riding his cavalry right into the middle of the table. My rangers come out 3” and let fly. I manage to cut down four of his cavalry in a single round. My reserves come on turn two, and I decide to bring them in to support my rangers. David’s reserves also come in, heading along my rear table edge towards the rangers. I position a few troops up on a hill to slow down the spearmen while focusing on the cavalry. Gandalf tries to Immobilize Suladan, but he manages to shake it off with Will. I’ll give this to Suladan – he doesn’t go down easy. Ecthelion and some buddies were desperately trying to take him down and while I knocked a wound off, I couldn’t do better. The next round I did manage to Immobilize Suladan, but could still only put another wound on him. I’m doing better with David’s cavalry, catching them without a charge, trapping them, and killing them. I finally manage to take Suladan out, and he is the last of the mounted models to fall.
In the mean time, I’m throwing blocking detachments out against the archers and the spearmen. David decides to split his spearmen in two, and I see a chance to eat another bite-sized chunk of Haradrim. I go after the part of his spearmen that are going left around the hill, filling them full of arrows with my rangers, then sending Ecthelion and several warriors over to help out from the cavalry fight. I manage to turn his flank and his warriors drop like wheat to the scythe. I’m also tearing apart his archers with Gandalf’s Sorcerous Blast and warriors while holding off the second contingent of spearmen with shielding warriors.
David’s force finally breaks, and this is the last straw. With no hero to hold them, half of his spearmen flee, and a few more kills reduces him to a quarter. We talked about this afterwards, and a few things were clear; 1) David made a big mistake by feeding his cavalry to my entire force. Between the archery and getting picked on by Ecthelion, Gandalf, and all of my warriors his cav didn’t stand a chance. He would have been much better served keeping them behind the hill until I closed with his archers. 2) He probably should have deployed his archers on his right as well to make reinforcing them with his spearmen easier. As it was they had to run across the entire table before getting to the fight, which by that point was almost over. 3) Gandalf is a very, very bad man who needs to keep his hands to himself. 4) My dice karma, which had been swinging in my opponent’s favor against Anthony, was back in my favor this time, particularly with the round of shooting that saw four of his cav killed. David was a heck of a lot of fun to play, kept a good attitude the whole time, and made sure the entire store knew that Gandalf was a dirty old man.
Result: Major Win (20 points)
Round 4
Opponent: Brent Sinclar – Harad
Table: The Shire (home field advantage, Brent!)
Scenario: The Artifact
This is the oh-so-abused scenario Seize the Prize with one itty, bitty alteration: you have to take the artifact off the enemy’s table edge. Let me tell you, this changes the entire game. Brent had a mean, mean list, with lots of Haradrim including cav, supported by a contingent of Mahud from Far Harad, including two Camel Riders and two Half-Trolls. I knew his mobility could create serious problems for me, but I was counting on my archery and Gandalf to negate that little advantage.
I planned on getting the artifact and running up the right flank, so I sent a large continent of warriors over the hobbit hole on my right to prepare the way while keeping my rangers in the right-center with a clear lane of fire and Gandalf to shield them with Blinding Light, and Ecthelion with all of my Fountain Court Guards behind the trees in the center. Brent had a typical cavalry/infantry deployment for Seize the Prize with four raiders in the center surrounded my his troops. His young Suladan with cavalry support, including his Camel Riders, were over in his left corner behind another hobbit hole.
Things started pretty typically – I moved everyone forward, starting up Blinding Light, and then moving the rangers 3” to shoot, while Brent rushed his cavalry toward the objective chased by his infantry. The rangers loosed their arrows, and I was disappointed with getting less than 50% hits. I rolled for wounds (we’d randomize hits if they wounded the D4 models), and scored 4!!! Two raiders were slain and the other two were unhorsed, including one which failed his thrown rider check and face planted. Sweet!
Unfortunately, they were still pretty close to the objective. We both continued to close, and my second round of shooting couldn’t hit the two forward deployed infantry. At this time, Gandalf tried to get Terrifying Aura going, but I rolled a 1. I finally decided to burn the might – I thought I’d need that Aura up and I wouldn’t get another turn where there wasn’t something more pressing to cast.
The next turn Brent won priority and had both models in contact with the objective. While he was finishing his move, I was doing my best to keep a poker face – I saw a golden opportunity. Once he finished, Gandalf threw a three die Command to bring one of the Haradrim out of the forest and towards me. Ecthelion and three Fountain Court jumped him, supported by more Fountain Court. I could almost see Brent blanche when he realized what I was going to do.
But when it got to his turn, Brent did not despair! No, he thought of a way to deal with this problem – volley fire and choose to hit his own guy! He launched his 12 arrows and… only one hit! Which I promptly allocated to an unengaged Fountain Court Guard against whose armor the bolt bounced off harmlessly. One Heroic Combat later, Ecthelion and his buddies were very up close and personal with the lone Harad warrior, who was duly dispatched, and Ecthelion dug up the prize.
Brent then threw his army at Ecthelion. We wasn’t able to get too many guys into combat with Ecthelion, but a Mahud supported by a spear made it. I really, REALLY wanted to get the heir to the Steward out of there, so I did another Command on the spear supporting model, which created a channel through which I could squeeze in a Fountain Court to help out Ecthelion. I blew his last point of Might in another Heroic Combat, which killed the Mahud and allowed me to run him through the channel. Controversial call here – Brent decided against challenging the Heroic Combat with his Mahud Chieftain, which would have resulted in the closure of the channel if it had worked. He felt it was more important to use that Might for later Heroic Moves.
The next turn Brent wins priority, but I call a Heroic Move with Gandalf. I think Brent challenged this one, but I managed to go first and get Ecthelion over to the warriors who had just crossed the hobbit hole and hand the objective off. I then throw Gandalf and the rest of the troops over there into combat to hold Brent’s group in place. Brent starts shifting his archers left to cover the area in the corner. While both forces are getting ground down in the center, the mass of warriors, including the one carrying the artifact, dash for the corner with Ecthelion in hot pursuit. Brent gets there first and goes into a prevent formation, intent on stopping me from carrying the piece off. First turn I succeed a little in breaking through, but not enough.
At the end of this turn, my force is broken. The Mahud and Half-Trolls in the center of the table have been busy killing my troops off and now I need to make courage checks. I get incredibly lucky and Ecthelion’s Stand Fast! keeps most of the Warriors of Minas Tirith in place. I take a careful, careful look, and see that there is a corridor and a courier for the artifact if I can remove some vital control zones. I manage to put just enough of my soldiers in to allow the carrier to run up, hand off the artifact, and for the recipient to thread the needle and carry the artifact off Brent’s table edge. Holy moly, I managed to do it! I didn’t get the major, because I was broken, but I’d take it.
This was about the best, most enjoyable game I’ve every played. It was challenging, thoughtful, funny, and very friendly. Brent is a fantastic player and painter, so our struggle looked really good on the table as well as looking really, really hard to deal with.
We talked about it a lot afterwards, and we agreed that I got lucky knocking down all of those riders in the first turn and that there wasn’t too much Brent could have done about the Command to facilitate the Heroic Combat. On the other hand, Brent’s decision to not challenge my second Heroic Combat cost him, since it meant he had to chase the artifact. He probably also should have brought Young Suladan over to the rear corner with the rest of the prevent defense to call Heroic Moves when he loses priority, which happened all three of the last turns.
Again, this was an incredible game and I’m really looking forward to playing Brent again.
Result: Minor Win (15 points)
I’ll update the last report as well as formatting and pictures tomorrow. Probably.
Subscribe to:
Posts (Atom)